This article describes how to view and manually configure the Boot.ini file in Windows XP from within the Startup and Recovery dialog.
In Windows XP, you can quickly and easily locate the Boot.ini to verify and/or edit the file.
It is suggested to backup the Boot.ini file before editing. The first tasks will involve modifying folder option so as to view hidden files and then backing up the Boot.ini file.
Save a Backup Copy of Boot.ini
1. Right-click My Computer, and then click Properties.
-or-
Click Start, click Run, type sysdm.cpl, and then click OK.
2. On the Advanced tab, click Settings under Startup and Recovery.
3. Under System Startup, click Edit. This opens the file in Notepad ready for editing.
4. In Notepad, click File on the Menu bar, and then click Save As.
5. Right click in an empty area of the Save As dialog box, point to New in the context menu, and then click Folder.
6. Type a name for the new folder, for example temp, and then press the ENTER key to create the folder named temp.
7. Double-click the new folder named temp, and then click the Save button to save a backup copy of the Boot.ini file.
Edit the Boot.ini File
To view and edit the Boot.ini file:
1. Right-click My Computer, and then click Properties.
-or-
Click Start, click Run, type sysdm.cpl, and then click OK.
2. On the Advanced tab, click Settings under Startup and Recovery.
3. Under System Startup, click Edit.
Sample Boot.ini File
This is a sample of a default Boot.ini file from a Windows XP Professional computer.
[boot loader]
timeout=30
default=multi(0)disk(0)rdisk(0)partition(1)\WINDOWS
[operating systems]
multi(0)disk(0)rdisk(0)partition(1)\WINDOWS="Microsoft Windows XP Professional" /fastdetect
This is a sample of the above Boot.ini file with a previous installation of Windows 2000 on a separate partition.
[boot loader]
timeout=30
default=multi(0)disk(0)rdisk(0)partition(1)\WINDOWS
[operating systems]
multi(0)disk(0)rdisk(0)partition(1)\WINDOWS="Windows XP Professional" /fastdetect
multi(0)disk(0)rdisk(0)partition(2)\WINNT="Windows 2000 Professional" /fastdetect
Modifying the Boot.ini
While you can modify the Boot.ini file using the Startup and Recovery dialog, where you can select the default operating system, change the timeout value, or manually edit the file, the following method uses the command line utility, Bootcfg.exe.
Note The Bootcfg.exe utility is only available in Windows XP Professional. This utility is not available in Microsoft Windows XP Home Edition. Therefore, this section does not apply to Windows XP Home Edition.
1. Click Start, and then click Run.
2. In the Open text box, type cmd.
3. At the command prompt, type bootcfg /?.
4. The help and parameters for BOOTCFG.exe will display.
Adding an Operating System
At the command prompt, type:
bootcfg /copy /d Operating System Description /ID#
Where Operating System Description is a text description (e.g. Windows XP Home Edition), and where # specifies the boot entry ID in the operating systems section of the BOOT.INI file from which the copy has to be made.
Removing an Operating System
At the command prompt, type:
bootcfg /delete /ID#
Where # specifies the boot entry ID that you want to be deleted from the operating systems section of the BOOT.INI file (e.g. 2 for the second Operating system that is listed.
CONTOH bootcfg /delete /ID 2 ==> untuk menghapus menu kedua.
Setting the Default Operating System
At the command prompt, type:
bootcfg /default /ID#
Where # specifies the boot entry id in the operating systems section of the BOOT.INI file to be made the default operating system.
Setting the Time Out
At the command prompt, type: bootcfg /timeout# Where # specifies the time in seconds after which default operating system will be loaded.
Open the Boot.ini File to Verify Changes
1. Right-click My Computer, and then click Properties.
-or-
Click Start, click Run, type sysdm.cpl, and then click OK.
2. On the Advanced tab, click Settings under Startup and Recovery.
3. Under System Startup, click Edit.
7.30.2010
7.25.2010
Cara Resetter Epson TX110 - TX111 secara Software
Kopi Paste dari ekohasan.blogspot.com
" Perhatian : Program adjustment ini mirip dengan virus sehingga dideteksi sebagai virus oleh antivirus. Matikan antivirus anda terlebih dulu agar program ini bisa berjalan "
1. Langkah pertama tentunya printer harus sudah terinstall drivernya.
2. Download software resetter Epson TX110 - TX111 dulu. Software bernama Resetter Epson Stylus TX110 - TX111, anda dapat download di sini.
3. Tanggal komputer tidak perlu dirubah seperti resetter sebelumnya.
4. Jalankan program resetter Epson TX110 - TX111 dengan double klik "AdjProg.exe", langsung di "AdjProg.exe" karena program ini " tidak menggunakan loader ".
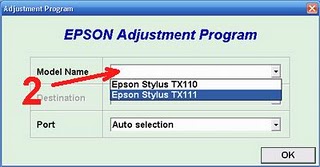
5. Kemudian ikuti gambar berikut ini :


"Check : digunakan untuk cek counter yang maksimal 7800 point, anda dapat melihatnya di main pad counter. Kalau lebih atau mendekati 7800 point berarti printer perlu di reset"
"Initialization : digunakan untuk mereset atau mengenolkan kembali counter printer"
6. Setelah selesai matikan printer kemudian nyalakan lagi. Printer akan nyala dengan lampu berwarna hijau penuh. Berarti printer Epson Stylus TX110 - TX111 yang blink tadi sudah siap digunakan kembali.
Selamat mencoba............ Semoga Bermanfaat...... Ditunggu komentarnya...... Karena blog ini sangat minim komentar, tolong bantu yaa.......
" Perhatian : Program adjustment ini mirip dengan virus sehingga dideteksi sebagai virus oleh antivirus. Matikan antivirus anda terlebih dulu agar program ini bisa berjalan "
1. Langkah pertama tentunya printer harus sudah terinstall drivernya.
2. Download software resetter Epson TX110 - TX111 dulu. Software bernama Resetter Epson Stylus TX110 - TX111, anda dapat download di sini.
3. Tanggal komputer tidak perlu dirubah seperti resetter sebelumnya.
4. Jalankan program resetter Epson TX110 - TX111 dengan double klik "AdjProg.exe", langsung di "AdjProg.exe" karena program ini " tidak menggunakan loader ".
5. Kemudian ikuti gambar berikut ini :


"Check : digunakan untuk cek counter yang maksimal 7800 point, anda dapat melihatnya di main pad counter. Kalau lebih atau mendekati 7800 point berarti printer perlu di reset"
"Initialization : digunakan untuk mereset atau mengenolkan kembali counter printer"
6. Setelah selesai matikan printer kemudian nyalakan lagi. Printer akan nyala dengan lampu berwarna hijau penuh. Berarti printer Epson Stylus TX110 - TX111 yang blink tadi sudah siap digunakan kembali.
Selamat mencoba............ Semoga Bermanfaat...... Ditunggu komentarnya...... Karena blog ini sangat minim komentar, tolong bantu yaa.......
Subscribe to:
Posts (Atom)
